Saturday, March 2, 2013

Simplicity - Week 9 YOJ Project 2013

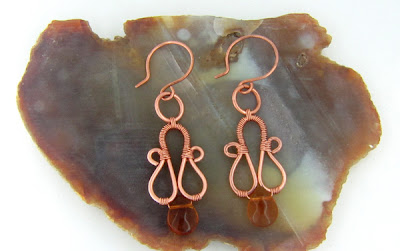
I haven't made jewelry in a week, been down a bit (having hypothyroidism has its ups and downs), but today I made a very simple pair of copper earrings for the latest week in the Year Of Jewelry Project 2013 with the theme: Simplicity. I guess simpler than that it doesn't really get.

All wire is copper and the briolettes are simple glass beads which go perfectly well with the copper color. Earrings measure a bit under 6cm including the ear wires (which are also copper).

I'm still behind with the Weeek 8 of the YOJ project with the theme 'Multiples', but I was really not feeling well enough to do one piece, forget about multiples...Will try to catch up with that project soon.


Thursday, February 21, 2013

Copper Wire Haul From The Scrap Yard

Woohoo looksie what I got from the local scrap yard - 6 kg (13 lb) of copper wire of different gauges, from very thin to up to  1.5 mm I think. I had to check online whether there is a scrap yard here in Nicosia, and sure thing there is. So I dragged hubby with me (he knows the places better) and when I got there the guy asked me how much I want - tons?  LOL

So I told him just some wire for myself for 'crafts'. And he showed me a container full of copper wire. I was in wire heaven! I wanted to move to that container for a second!

Sadly they didn't have copper sheet or bronze wire, which I also wanted, so those will still be ordered online from abroad, but at least what copper wire is concerned, even with this haul I have enough for several months. Now just to take the caliper and figure out what gauge wires I've accumulated! Wohoo!


Saturday, February 16, 2013

YOJ Week 7 - Off The Cuff

The project for the 7th week in the Year of Wire Jewelry 2013 is called Off the Cuff. Now I'm not good with cuffs and bangles at all, and I've made quite a few chain maille bracelets so far, so I've decided my theme for the week to be 'off the cuff and on the neck' - a necklace.

Earlier this week I made my first JPL necklace (Jens Pind Linkage chain maille weave), and I've been thinking for a few days what pendant to make for it. Finally I've decided that a simple wire wrapped pendant with a few chain maille elements should mattch quite well with it.  The necklace is made of a mixture of bronze and copper wire - bronze for the chain maille part and the pendant frame and copper for the wrapping part.

What do you think, do they go together?


Thursday, February 14, 2013

Got Myself Some New Cool Jewelry Toys

I was browsing Zoraida's blog, specifically the post about bracelet mandrels, when it dawn on me that I want one too! I haven't done many bangle style bracelets, or those that actually need a mandrel, but for the few I've done, I've always shaped them by hand, with not the best results, especially if you want to sell those pieces.

So off I went to the local jewelry store (my usual store for buying sterling silver wire), and I came home with not one, but ...several goodies that emptied my wallet for the moment. Oh well, it's for a good cause.

(click the picture for the large view)

So I came home with the bracelet mandrel- I actually wanted a stepped one, but they only had this, and when I saw it, I quite liked it, so it got sold.

I bought a jeweler saw, as my old one is getting undone and it doesn't hold the blades as well as it should. Then got myself the actual blades, as I didn't have this size - 1. I have 2/0 and 3/0, but those are for sterling, and I found that they don't work as well for cutting bronze rings, which is much harder then silver or copper. So I'll give these a try. At the shop they assured me it will work.

Then bought a small table vice with clamps made specially for jewelry work. I have a huge old one that is kind of awkward to work with, so it was time to upgrade.

Then bought some leather-like cord for any copper pendants I might do, and finally 3 finger protectors since I need them for when cutting wire for jump rings with the jeweler's saw. I have 3 but they're already worn out and I wanted some shiny new ones.

Oh and the small black thingie in the middle, it's some bracelet display made of hard plastic. It was very cheap on Ebay and it happened to arrive today, so I added it to my 'cool toys to play with' stash.

So there, my haul for today thanks to Zoraida, lol. And I only wanted a bracelet mandrel...

Monday, February 11, 2013

Bronze Byzantine Chain Maille Bracelet - For Men

In the previous post I showed all my bronze and copper goodies that I got in the mail from the UK. So here is the first thing I did from it - a simple, but elegant chain maille bracelet in bronze. It's actually perfect for guys (for gals too, if they love chunky bracelets). I love the Byzantine weave, the bracelet it's so sleek on the wrist, and while it's a bit on the heavier side, it doesn't feel like it at all.

For the bracelet I cut the rings myself, and then put it together from rings of these stats: 1.25 mm WD, 11/64" ID (4.37mm), with an AR of 3.5, which is perfect for the Byzantine.

The size is customizable, can adjust easily for a woman or a man's size as well, totally free.

Here are a few photos that I took from the bracelet, which is already up in my shop under this link: Byzantine bracelet


Wednesday, February 6, 2013

Got Goodies In The Mail

Since sterling silver is so prohibitively expensive these days, I've started dabbing in other materials, and right now my favorite now is bronze. It is similar in color to copper, but the wire is harder, and for chain maille, harder jump rings are better than softer ones.

About a week ago I put in an order at wires.co.uk for some bronze wire and some samples of other materials, including square copper wire. My order just arrived, and it's awesome! I'll definitely use this UK seller in the future for wire, unless I get a good supplier of it right here in Cyprus - which I doubt I'll find.


Silver Heart Pendant

This tiny sterling silver heart pendant in byzantine weave was made for two challenges: the February challenge in the Chain Maille Facebook group (heart or armour) and the 6th week of YOJ project with the title "Embrace".

It is really tiny, it measures 2.5cm (about 1") in length including the bail and 2cm (less than 1") at its widest point. It's very cute and I can imagine it on a thin chain or a short leather as a choker. Perfect when you want something cute, discrete that enhances, rather than takes away from the beauty of the dress or neckline.


Friday, February 1, 2013

My Jewelry In A Dawanda Adsense Ad

Looks like Dawanda started to heavily advertise in PPC (pay per click) through Google Adsense. I was just browsing one of my favorite book sites Goodreads to write a review for a book that I've just finished reading, when my eyes caught an ad on the right side of the screen for Dawanda. The screen changed a few times with new products and then I saw one of my chain maille bracelet, yay!

From all the many thousands of products listed there (Dawanda is the European version of Etsy, a bit smaller, but evergrowing), mine was spotlighted. I had to capture a screenshot to keep it and frame it (lol).

Click on the image to see the full view.


Thursday, January 31, 2013

Square Knot Bracelet In Bronze

Sterling silver is quite expensive, so I've decided to experiment in other materials that are not only cheaper, but also quite cool actually. This piece was made in bronze and it's called Square knot based on the B2 weave. It's quite fun to do and awesome to wear. I love how is rather loose on the wrist and kind of fluffy. Now try to do this heavy one in sterling silver!

The clasp is an antiqued bronze square clasp. Not sure yet if I'll keep it. The color is a bit off compared to the bracelet, but it does make a nice contrast. Bracelet measures 19.5cm (almost 8") and it's made of 4.4 AR various size bronze rings (bought from TheRingLord).


Wednesday, January 30, 2013

Byzantine Wrapped Earrings

A quick pair of sterling silver earrings done in the chain maille Byzantine weave. The beads are amethyst with a very lovely color. Earrings length including the ear wire is 6.5 cm (2.5"). All metal, including the ear wire is sterling silver.

For wrapping the bead in the semi-herringbone weave I used a free tutorial by Heidi K. (link to her tutorial is in my Best free 4 herringbone weave tutorials post, reachable from the sidebar of this blog.)


Tuesday, January 29, 2013

Gothic Silver Chain Maille Pendant - YOJ Week 5

This silver pendant is made for the YOJ Week 5 challenge with the theme 'deja-vu', aka before and after. About 4 years ago when I dabbed a bit in chain maille, I made a Rondo a la Byzantine pendant with a goldstone bead wrapped at the bottom. I never really did anything with it afterwards, and I left it forgotten for 4 years.

Now looking at some of my older pieces to work up for the challenge, I found it tucked in a ziplock bag.

So here is the before and after. Bad picture quality for the before as I only snapped quickly a shot of it in the evening so I have something to show for the challenge.

The new piece has a smaller black onyx wrapped bead. All metal is sterling silver that I cut in jumprings.


Thursday, January 24, 2013

Byzantine Knot Silver Bracelet

Here is a bracelet I finished last night. Tumble polished it and took pictures of it today. It's a weave that I learned, I saw a bracelet just like it and was curious as to how they did it. Found the weave at Mailleartisans, and here is the result.

I quite like it, however personally I like daintier chains than this. However when worn is quite beautiful indeed.

The rings I cut have these stats: 0.9mm 4.27 ID, with an AR of 4.74 (this is just for me really, if I want to do another one, to use this as reference). The bracelet measures 19.5cm (7.5") including the lovely silver heart clasp which I bought from Etsy from a wonderful seller a while ago.

Note: the Byzantine Knots weave was invented by Christian Dietrich) and if anyone wants to learn this weave, there is a also nice tutorial by Zili on Mailleartisans.


My First Full Persian Cross

I was always jealous of folks who could do the Full Persian cross, and I couldn't because the full persian weave always eluded me. Well, not anymore. I've learned the weave from Spider's DVD and then went off and learn the cross from a tutorial from Mailleartisans, I think. Now that I know the weave, making the cross is extremely easy, I might add.

Used some practice jump rings from The Ring Lord, so the closures are not the best. The next one is in silver.


Sunday, January 20, 2013

Butterfly Earrings - YOJ Week 4 Project

Here is my 4th week Year of Jewelry 2013 project, with the them "Not from the Mall". When I started this pair of earrings I only knew I wanted to do the butterfly weave, but I had no idea how they will turn out. I used at least 3 different ring sizes, and finally decided on the turquoise briolette.

Speaking of the briolette, this is also a good example how to cheat when you can't wrap a briolette worth beawns (that is me). After all these years, wrapping a briolette the right way eludes me. I've watched countless Youtube videos, looked at various tutorials, nothing helped. So I've settled on a bit of cheating. And to be honest, I kind of like the result.

Still have to tumble the earrings as the silver jumping are not quite shiny yet. I hope I won't destroy the turquoise in the process.


Saturday, January 19, 2013

Rosetta Chainmaille Bracelet In Sterling Silver

I liked how the Rosetta weave looks from the first time I saw it. It's an easy and fun weave to do, one that I haven't tried until now. And I quite like the result. It looks slightly like a variant of the Byzantine weave, but it's woven up completely differently.

It's very sleek and soft when worn, it's becoming one of my favorite weaves.

This bracelet is made of sterling silver, measures almost 19 cm (7.5") and the jumpring dimensions I used when I cut them from the silver wire were: 3.84 ID for the 2 in 2 chain and 3.5 ID for the 4 side rings, wire of 1mm WD.


Monday, January 14, 2013

Week 3 YOJ 2013 - White Pearl Sterling Silver Earrings

When the new theme for the week 3 in the Year of Jewelry Project came up: "music", I knew just what I wanted to do. I've recently seen a simple  but very cute pair of earrings that were last year auctioned off at the Julien Auction House. The earrings auctioned off used to belong to the late diva Whitney Houston, which she wore while filming the Bodyguard.

I have a few freshwater pearls that I got not long ago, so my fingers were it itching to do something with them. And this is the result. A simple design that goes well pretty much everywhere: a wedding, a party or worn with a little white dress or jeans.

Materials are freshwater pearls, all metal is sterling silver including the ear wire. Length of earrings with earwires is close to 5 cm (almost 2 inches).


Saturday, January 12, 2013

Week 2 - Grace - The Year Of Jewelry Project 2013 Entry

Here is my second week's entry in YOJ project 2013, with the name Grace. For me grace is something simple, without too much fluff and extras, something elegant and classic.

So for this entry I made a pair of silver earrings with chain maille mixed with wire wrapping. Chainmaille weave is JPL (Jens Pind Linkage) and the wire wrapping part is herringbone weave surrounding the cute onyx beads. Not the best pics, I'll try to take better later and post them as well here.


Wednesday, January 2, 2013

Stepping Stones Bracelet In Nickel Silver

Here is my Stepping Stones bracelet - I have entered it in the first week of The Year Of Jewelry Project Facebook group.

I'm still working on the sterling silver one based on the tutorial I wrote for it, but as my silver rings finished and I was not in the mood just now to cut more, I started and finished this piece. It's quite heavy, even the big rings are doubled-up. This piece is made of 2 size rings only, all the connector rings being of the same size. I had some nickel silver rings that I bought earlier on from The Ring Lord, and that's what I used here.

Love this weave, I can't wait to finish the sterling silver bracelet as well.


Tuesday, January 1, 2013

Stepping Stones Weave Tutorial - My Way Of Doing It

First of all Happy New Year to everyone reading this blog!

This is my first post this year and a tutorial for the Stepping Stones chain maille weave for an alternate way of doing it for those (few) like me who are math challenged (despite my mom being a math teacher, lol).

I made a Stepping Stones bracelet a few days ago (design by Corvus Chainmaille) based on the free tutorial from Mailleartisans, which is very easy to do. I created the bracelet without a problem - until I wanted to do a pair of earrings with different size large rings which assumed a different number of small connector rings to attach the large ones to - especially when working with 3 ring sizes, as opposed to 2 sizes that the tutorial from Maillerartisans is based upon.

While looking at my bracelet for a little while, I realized that the whole thing is nothing but a 2 in 2 chain with some additions. I deconstructed it in my mind, and hopefully this tutorial will help a few - it is a bit slower going because I did it in 4 different phases, but some steps can be done together once you read through the basics.

So first here is the silver piece I started with, in an overview as to my progress so far. I will also post the bracelet once it's fully woven together. I used here 3 sizes of rings:
- large rings  (I used 1.5mm rings with ID of 6, for an AR of 4)
- medium rings (I used 0.9mm rings with ID of 3, making it a 3.28 AR)
- small connector rings (I used 0.7mm rings with 2.5mm id with AR 3.5)


Above you can see the bracelet in different stages of 'being', and some silver rings that I'm using to work through the piece as well.

Step 1 - Create a simple 2 in 1 chain in two ring sizes. Attached to this medium size ring are two small rings (the connector rings). Make the chain longer than a regular bracelet size, since the addition of the big rings will curve your chain and make it shorter.


Step 2 - Double up the medium rings so you end up with a long 2 in 2 chain as shown below. So you have 2 med. rings connected to the two small rings.

Step 3 - Start adding 2 small rings on one side of the medium rings, like shown below. How many of these 2 ring sets you will add will depend on how big your large ring is and how curved you want your piece to be.  The original tutorial calls for 4 double-up small rings, I used 6 in this example. So basically the medium rings will have 3 sets of small rings on them - two sets as connectors, and one set lose in the middle (as shown in the image below). Once you have the 6 double rings (or how many you want your large ring to be connected to), when you add the next set of 6 rings, add them to the opposite side of the medium size rings.


Step 4 - Now add the large rings. So far I've added two large rings for each 6 sets of small lose connector rings. As I go along, I will keep adding more.

One other reason why I prefer doing it this way is that in case I want to add a different size of large rings or attach it to a different number of small connector rings (e.g. a focal point on a necklace), I can decide right there how many connector rings to add as I progress with the piece and see visually where I am at the moment.


While this is quite basic, maybe it's the way my mind works, but this is how I could make sense of it all. I hope it does help someone mathematically challenged like I am :)
Monday, December 10, 2012

Finally Learned HP3 In 1

It took me quite a while, but finally I've learned the HP 3 in 1 chainmaille weave. It's not easy to start, but Spider's second DVD makes it almost a breeze. Of course it also helps that the AR of the rings is around 5, so you're working with larger rings to start with, so you can keep the first few rings between your fingers without letting them slip.

Made my first chain in bronze. Not very happy with the closures, reason being the rings I got about 4 years ago from TRL in a jewelry kit, where the ends have all burrs and are pointed. Very bad quality. I should have bought instead saw cut, but what did I know at the time.

Anyway, here is my first half persian 3 in 1 chain, regardless of the closures, I'm quite pleased with it.


Related Posts Plugin for WordPress, Blogger...

Search with Google

Custom Search